In part 3, we covered the purchase of a wrecked 2016 MX-5 Miata to build for SCCA autocross purposes. As a reminder, the car had been involved in a rollover, but still was billed as a “run and drive” car. We finished up the last installment with driving the car into our trailer at the Copart facility in Pasco, Washington.
The four hour return trip to Seattle was filled with much excitement and anticipation. We had finally purchased a car, and now it was time to assess the damage, make a game plan for repair, and as part of the assessment and repair, finalize where the car would start in the SCCA classing structure.
When we picked up the car, the top was in the up position. As anyone that either owns or has used an enclosed trailer knows, getting in and out of the car while it is inside the trailer can be an interesting experience. The beauty of a convertible is that you can put the top down, step on the seat, and make this much easier. After unlatching the top, I was able to put it about ¾ of the way to the full down position. Definitely good enough to get in and out of the car, but obviously there was a problem that we’d have to look into.
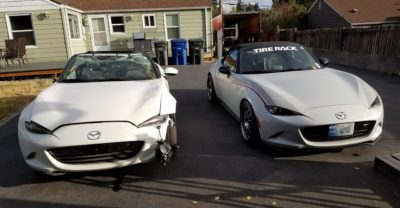
Saturday morning brought the first opportunity to get a full look at the car. Starting with the exterior, we quickly confirmed that nearly every body panel had some damage to it. The only panels that wouldn’t require replacement were the left rear quarter, the trunk lid, and the rear bumper (although we later determined that it too should be replaced due to a small ding.) The left headlight was completely detached and would require replacement, As noted previously, the windshield was broken and the windshield header compressed in the middle. The soft top itself appeared to be in good shape including the rear window, but the frame was broken on one side and dented where the windshield header damage was.
Moving inside, we were happy to confirm that none of the airbags had blown. Overall, the interior of the car seemed to be in great shape, including the leather seats. The door windows were all shattered and there was lots of dust everywhere so a lot of cleaning would be needed. The drivers seat belt had been cut to free the driver, so it to would need to be repaired or replaced.
We then opened the hood, doors, and trunk to look for hidden damage and happily didn’t find any. The car was then put up on the lift for a good look underneath. Again, everything seemed in good order. Lastly, we did a quick alignment check and everything was in spec.
Bottom line, we knew it had been risky to buy the car without a good look-over in person. Fortunately, our initial thoughts based on pictures were confirmed, and the damage was primarily cosmetic.
Our goal with buying a car was to hopefully start in Street Prepared and then move on to Prepared. That being the case, the car would need to be put back to stock specs. This left the windshield header as the big unknown. Would we be able to straighten it? Did the whole frame get compressed? To figure this out, and really start the whole project, we pulled off the piano black windshield “garnishes” to get a good look. To our surprise, we found that the center section of the header was a separate piece that was spot welded in place. On all earlier generations, the whole windshield header/surround was one piece. Upon closer examination, the side portions of the surround were undamaged, with the measurements in spec. This realization meant that we could indeed start in Street Prepared.
Next up, we started disassembly. Off came the bumpers, fenders, doors, windshield, and soft top. We again took a close look with everything off the car, and aside from some minor bending where the left fender attached, we confirmed our initial determination of no frame damage.
The big part of the fix would be replacing the right rear quarter panel. We had done this replacement on our NC MX-5’s left quarter panel, so we knew we’d need to cut out all of the spot welds to get it off. To our surprise, there were around 70 spot welds holding the panel on.
The process to cut them out is to use a spot weld cutter, which is essentially a hollow drill bit that cuts the space around the weld, freeing the outer panel from the inner. Once the outer panel was entirely free, we were able to massage the inner panel back to straight to ready it for the new quarter. The repair procedure required plug welding the new panel on. On our NC, since we built it to Prepared from the start, we were able to rivet the panel back on. Street Prepared doesn’t allow allow alternate attachment, so we’d need to go through the proper repair procedures. We also removed the center section of the windshield header.
After taking a full inventory of the parts that we’d need to replace, we placed our order and waited for everything to arrive.
Initially our plan had been to take the car to a body shop to have them do the plug welding. I had been wanting to learn to weld for a long time, so this seemed like a great way to force myself to learn. I found a local welding shop that did classes and signed myself up. I then purchased a welder and went to work practicing my spot welds on spare material. Once I was confident in my ability, I went to work on the car itself. We sprayed on weld-through primer, which is a copper based primer that melts back into the welds, and did all of the plug welds.
Next we installed seam sealer and epoxy primer over the welds. In the end, everything turned out great, and for what it would have cost me to have a shop do the work, I now had a new skill and a welder. Happy days!
While ordering parts, we determined that the soft-top frame was only sold as one piece. This was unfortunate, as we really only needed a couple pieces of it replaced. This turned out to be the most expensive by far of the replacement parts. Now is a good time to again talk about having a plan. Since our ultimate goal with the car was to end up in Prepared, it would have been substantially cheaper and easier to go directly there. So again, be realistic on what you’re willing to spend.
We moved the soft-top fabric over to the new frame, and remounted it in the car to verify again that everything fit correctly. You can never check things too many times!
With all of the new parts on the car and fitment verified, it was time for paint! We dismantled the car again to make less work for the body shop. While the easiest option would have been repaint the car in the stock Pearl White Metallic, we decided to do a color change. The DP class has many bright colored cars, including our green NC. We knew we wanted a bright color and after much deliberation, decided that a bright blue would look fantastic and be different from the rest of the class. In the end, we chose to go with a color called Ultra Blue Metallic.
We went to a few well regarded body shops to get estimates and were shocked to find out how much it was going to be to paint the car. We had expected that with all of the disassembly done, it would bring it down to a reasonable amount, but it still was not cheap at all. At this point we considered wrapping the car, as well as painting it ourselves. A wrap would have been half the cost and easily repairable if any future damage occurred, but the lifespan is considerably less an paint. Spraying it ourselves would have likely been the least expensive option, but painting an entire car is completely different than rattle canning small parts. In the end, we decided to bite the bullet and get the car professionally painted. The results speak for themselves, as the car looks fantastic!
With the car back from paint, it was now time to put everything back together. Inner door panels and new windows were moved over to the new shells, trim pieces were put on, lights were reinstalled, the soft top put back in place, and the new windshield bonded in. All told, this repair process took around 6 months of evenings and weekends to do. It certainly could have been done quicker, but it was done over the winter, so there was no rush.
Since the car had been purchased from an insurance auction, it came with a Bill of Sale, but no title. Our previous NC came the same way, and we left it at that. With the ND, once we determined that the damage could all be repaired, our end goal was to get the car licensed and legal for the street. This not only would allow us to drive the car to events, but allows testing of parts to be done on the street. Our biggest challenge with the NC was remote engine tuning since we couldn’t legally drive it on street. While tuning can be done on the dyno, real world street driving can give better data on newer cars.
In Washington state, the car must be brought to a State Patrol office for inspection before the Department of Licensing will issue plates and a Rebuilt title. Once we were confident all of the safety items worked correctly (lights, horn, etc.) we scheduled our appointment and got a temporary permit to allow us to drive the car to the inspection station. The inspection requires that you bring the sale documents for the purchase of the car, along with receipts for the purchase of the major parts needed to repair the car. They then look over all of the receipts, verify the repairs, check for unrepaired damage, and verify the VIN numbers on the body. The process sounds simple enough, but this inspection and the subsequent licensing of the car was probably the most stressful part of the build to date, as you never fully know the process until you go through it. Fortunately, we had no issues and the car is now fully rebuilt and licensed!
Our next installment will move into actually building the car for Street Prepared. While the car was being repaired, the SEB (the rule making board) put the initial classifications as BSP and DP. We had fully expected the car to land in CSP with all of the other Miatas, but the SEB decided it was safer to class it “up” a class. Therefore, we’ll be up against the Mazdaspeed Miata and Honda S2000s. It will definitely be an uphill battle, but we’re up for the challenge.
More to come soon!
Wrecks to Racers, Part 3: My Search
Wrecks to Racers, Part 2: Searching For Your Car
From Wrecks to Racers
 ACCESSIBILITY